you can download : @ Taggers Palace HERE
Splish Splash Freebie
you can download : @ Taggers Palace HERE
Posted by Liana at Friday, March 27, 2009 1 comments
Labels: freebie Scrap kits
Splish Splash
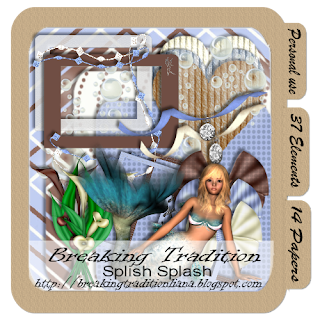
Here is my new scrapkit
This kit is saved in jpeg and png format
it has 37 elements one of which is a mermaid tube and 14 papers
not all elements are shown in preview
this kit is for personal use only
you can download : @ Taggers Palace HERE
Posted by Liana at Friday, March 27, 2009 0 comments
Labels: freebie Scrap kits
The Enchanted Garden
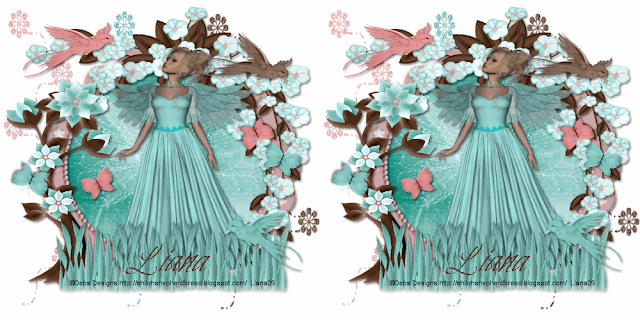
The Enchanted Garden
This tutorial is my design if it is similar in anyway to another tutorial this is totally coincidental.
Supplies
Plug in's needed
ECWS - Edge Fade
DSH FLUX - Bright Noise
http://www.chezzoumba.com/filtres.htm
Scrapkit
Enchanted By Deb's Designs
(I used the tube in this kit)
http://heartbeatzcreationz.com/
FONT
Bilbo: http://www.4shared.com/file/94937644/200ed343/Bilbo.html
Once your ready open your supplies in psp
please remember to add drop shadows and to save regularly
Drop shadow settings i used
VERTICAL = 2
HORIZONTAL = 2
OPACITY = 50
BLUR = 5
COLOR = BLACK
Ok lets begin
1
Open new image 500x500 flood fill white,
open the flower glitter doodle and paste as a new layer
resize as needed.
2
Now open Frame 2 and paste over the flower doodles.
You will need to resize this so that you can still see the doodles behind.
3
Now i want you to grab your magic wand and select inside the frame then go to
selection > modifty > expand > 3
add new layer and paste paper 2 into selected > select none,
drag the paper layer so it side behind your frame.
4
Now get flower branc 1 and paste on top of your frame,
and resize so it looks like its hanging on to it.
It should be sitting on the frame in the top right hand corner.
5
Next to the tree open this up and resize then
paste and move to the left corner of the tag.
(hope you have been adding your drop shadows)
6
Now open your grass and get your crop tool and cut out the blue grass then paste as new layer.
Resize and move to the middle of the tag at the bottom
go to effects > plug ins > ECWS > Edge Fade by 84.
7
Open and paste in your birds and butterflies and place where you want
I have used all three birds and both butterflies.
8
Now its time to add your tube as you can see i have used the one from the kit.
You will need to resize her and paste as a new layer just behind your grass
then move her to the right a bit.
9
Add your copyright info
licence number .
(if required)
10
If you are not going to animate please merge visable now
if you are then dont merge yet.
11
Click on your doodle layer
duplicate x2.
Hide the top layer
Go to effects > plug ins > Dsh Flux > Bright noise > 37
then copy merged and paste into your animation show as new animation.
12
Repeat step 11 but make sure you have swapped the layers around
so that you are clicked on the top layer and bottom one is hid.
Paste this after selected in animation shop.
Now you are done you just need to add your name and away you go
Thank you for trying my tutorial
Liana xx
Posted by Liana at Wednesday, March 25, 2009 0 comments
Template 6

Here is my 6th template for you all this is for personal use only
please leave a comment on downloading
Download :HERE
Posted by Liana at Tuesday, March 24, 2009 3 comments
Miss Bitch
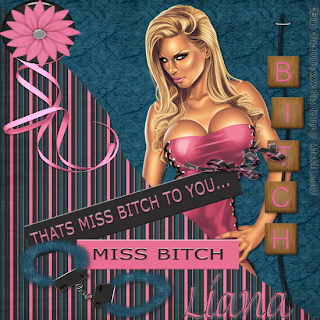
Miss Bitch
This tutorial is my design if it is similar in anyway to another tutorial this is totally coincidental.
I'm using the gorgeous art of Elias Chatzoudis .
You have to purchase a license.
if you do not have one you can get one
http://www.mypsptubes.com/?p=home
Supplies Needed
Scrapkit Miss Bitch by
Bluedream which you can get
http://bluedreamdesigns.blogspot.com/
Filter needed : Unlimited 2
http://www.chezzoumba.com/filtres.htm
Ok lets begin
Dont forget to save regularly and add drop shadows to your layers.
Open your supplies in psp so you have them to hand.
Now open new image 550x550 transparent
Now go to your supplies and open paper 6 now copy and paste as a new layer, then open paper 2 and do the same as paper 6 now grab your freehand selection tool and select Half of paper 2 so its jagged looking not a straight line once you have this done hit delete.
So now you should have like above image.
click on you paper 6 layer and go to effects > filters > unlimited 2 > paper textures > Japanese paper and hit ok.
Now back to top layer and open your elements,
Grab the word charm "BITCH" no need to resize and copy and paste to the right of the image
once you are happy with that open the pink ribbon paste as new layer > resize using your deform tool and move to the left of the image.
Now open the Slave glass bead resize and place over the pink ribbon repeat this with slave flower 1
(see image above)
Open label 1 and move it up the image and resize and tilt to the left a bit, now back to your elements and open label 2 > resize and leave just below label 1.
Open bow 1 and resize so it can sit on the right corner of label 1.
We are nearly there :)
last element needed is the handkuffs
so grab handkuffs 2 and paste as new layer these should be on top of everything else,
resize and move to the bottom left corner.
right now you need to add your tube.
to do this go back down to the layer with paper 6 and copy and paste your tube as a new layer and it should look like she is behind paper 2
Add your copyright info and licence number
(if needed)
merge visable
and your Done
thank you for trying my tutorial
Posted by Liana at Monday, March 23, 2009 0 comments
Blue Eyes
Blue Eyes
This tutorial is my design if it is similar in anyway to another tutorial this is totally coincidental.
I'm using the gorgeous art of Keith Garvey. You have to purchase a license to use his work.
You can get one
http://www.mypsptubes.com/?p=home
Supplies needed:
Grazy Sweet Girl scrap kit
http://grazythebeauty.blogspot.com/2009/03/grazy-sweet-girl-freebie-51-elements-10_9510.html
Font of choice
Ok lets get started.
open your supplies in psp.
Open a new image of 450x450,
make sure its transparent.
Now go to frames and open frame 040 (black &pink)
once you have this open copy and paste it as a new layer , resize, and add a drop shadow.
VERTICAL : 3
HORIZONTAL : 5
OPACITY : 50
BLUR : 5.00
COLOR : BLACK
(now keep in mind most of this kit will have to be resized, you can do this using your deform tool.
This just helps clear that up so now i only will have to put in to resize lol)
Now i want you to go to the layer behind the frame.
You can do this on the right hand side under layers.
You still with me, right open one of the papers i have used paper 080 and resize so it fits behind the frame.
Now back to the top layer,
open leaves 040 and leaves 050 and resize both and paste as new layers,
you want 040 under 050 add drop shadows to both these
using the same settings as above.
Now go to the layer below your frame and add your tube,
now add your drop shadow @
VERTICAL : 2
HORIZONTAL : 3
OPACITY : 50
BLUR : 5.00
COLOR : WHITE
Now she should look like she has a bit of a glow.
Now add your copyright info and licence number (if required)
Merge visable in layers and you are done
Thank you for trying my Tutorial
Liana xx
Posted by Liana at Monday, March 23, 2009 0 comments
Many don't understand the ADHD mind.
Posted by Liana at Monday, March 23, 2009 0 comments
Labels: ADHD


